Showing posts with label seche vite. Show all posts

Saturday, April 28, 2012

Sage in the City

Hello nail bloggers/readers!! I hope you all are having a fantastic day!!

Yesterday I picked up a little something at my local Walgreens. Wet n Wild came out with their Summer Getaway line, put the polishes in tiny 5mL bottles, and packaged them all together for $3.99. Great price for me! I also really enjoy smaller bottles. That way if I hate the color, I don't feel bad for spending more on one polish.

 They all have super clever names...or at least I'm sure Wet n Wild thought they were clever. I only have an issue with one of the names.

In this kit you get:
Buffy the Violet Slayer: This is a gorgeous purple color.
I haven't tried all of these...well, honestly, I've only tried one, but I'm planning on swatching all of these through out the week. This is a darker purple color, that appears to have lots of shimmer.

9.0.2.1.Orange: Looks like an orange jelly with lots and lots of orange glitter. I'm excited to try this one!

FuchsiaRama: This one looks more purple to me in the bottle. It looks like a creme polish...but who knows, it might lighten up to a dark fuchsia. (I love this name because I am a huge Futurama fan. lol)

How I Met Your Magenta: This honestly does not look magenta to me. It is hot pink. It is a cute pink, with lots of shimmer. I can't wait to swatch this one for ya.

The Wonder Yellows: This one looks to be a yellow frost with lots of shimmer. I'm excited about this one too..but I have a feeling I will need a more opaque polish to go under it.

And finally, the color that I have swatched for you today:

Sage in the City.

First of all: I do not wear green. I don't think it looks good on my fingers or with my skin. I have an olive skin tone...so I feel like it draws out the green in my skin color.

Second: Nice try Wet n Wild. Trying to be so clever made you look like you're colorblind. THIS IS NOT SAGE. This is almost lime green! We'll call it a dark lime green. I do like this color, but the name really bothers me. Whoever made this color and was like "Hey guys, let's call this SAGE IN THE CITY! Get it? A spin off of SEX IN THE CITY! GENIUS!" is an idiot. They could have called it Glime...like GLEE with lime, or Lime and Order. Or what about The LIME word. Sigh.

Anyway, on to the polish.

I found this polish to be awfully thick. And it left visible brush strokes. The good part was it only took two coats to become completely opaque. I really really really DO like this color! A lot! I wish it looked good on me, cause I would wear it all the time!!

All of these photos were taken with my flash...as it is night time. (I'm going to be super busy this weekend, so I am swatching and writing my posts and post dating them for the actual day I want it posted. Pretty genius Blogger. Kudos to you for making this function for us crazy busy moms.)

I also think their Fastdry technology isn't really that fast. They advertise that one coat will dry in 60 seconds. But with my one coat of Sally Hansen's Double Duty base coat, two coats of Sage in the City, and one coat of Seche Vite, I don't feel like it dried all that fast. After a few minutes, it felt dry, but was dentable. But then again, it was a pretty thick polish. Maybe I got a bad batch.

What do you all think of this color? Do you think I should brave green, and wear it more often? Is it just my eyes that see how terrible it looks on me??

Until next time....

Christina

Ps:
My Mercury Twilight took a few hours before chipping. :( Boo. But I really think it was because I had my hands in water a lot.


Disclosure *I was not paid for this review. I was not given the polish for this review. I paid for the polish with my own money. This is purely my own opinion, thoughts, and suggestions about this polish.*

Wednesday, April 18, 2012

I don't give a Rotterdam!

I purchased a few new polishes recently. Two of them were: OPI's I don't give a Rotterdam! (which now I can cross off my wishlist!) and Layla Mercury Twilight. I have been searching for a hologram effect polish for a while now...and $15.50 later, I found one. Sigh.

On to the photos.

Here is OPI's I don't give a Rotterdam! Sorry for the blurry photos...if you see that white skin up on the left upper corner...that's my daughter Seyhan. She was trying to get into all of the photos. Sigh. LOL.

I really like this polish, as I knew I would. It is a light blue with sprinkles, as Seyhan calls them. :)

I used:
1 coat Sally Hansen's Double Duty base coat
1 coat Orly's base coat
2 coats OPI I don't give a Rotterdam!
(I should have used three, to patch up bald spots, but I knew I was painting over it...so I didn't)
1 coat of Seche Vite.

 I really like how this isn't BLUE. It is subtle..and kind of greyish...I love love love it.

Then I decided to try out my Layla Mercury Twilight.

I used:
1 coat Layla Mercury Twilight
1 coat Seche Vite

Ok. I really like this polish...but I do not like it as a one coater. In the house, I can see brush strokes. I wanted this hologram to be a little more sheer to go over other polishes....but that is not the case. You can barely see my beautiful Rotterdam blue.

Out in the sun, it is gorgeous. You can't see brush strokes. No bald spots. Just rainbow goodness.

I think this polish will be amazing by itself. And it better be! For freaking $15.50. SHEESH.

I think this was a great manicure....given my lack of knowledge on these polishes. Next time I will use Mercury Twilight by itself, and do three coats instead of two of I don't give a Rotterdam.

What do you all think of this manicure? Do you know where I can find a sheer hologram polish that layers over polishes well??

Until next time....

Christina


Disclosure *I was not paid for this review. I was not given the polish for this review. I paid for the polish with my own money. This is purely my own opinion, thoughts, and suggestions about this polish.*

Friday, April 13, 2012

Galaxy

I am sure you all are SO sick of seeing Galaxy nails...but I have never tried it...so here we go!

I would have loved to take photos with all the polishes I used...but I would end up with a lot of photos. If you are interested in the colors, I can photograph them together, and list them. But for now we will just call them by their color. Any combination of these colors will work!

Here's my process:
1 coat Sally Henson's Double Duty base coat.
1 coat Orly's base coat.
2 coats Pure Ice Black Rage.
I sponged on the design.
1 coat of Sinful Colors Queen of Beauty
1 coat of Seche Vite

 I used a white, yellow, pink, teal glitter, and a little bit of Hard Candy Beetle. I used my dotter for the white stars. Then added the silver glitter on top for more stars.

I learned how to do this manicure on Youtube. The link to the tutorial is HERE.

It was SOOO easy! Easier than I thought it would be. And I think it turned out beautifully! :D

And the surprising part of it all, this manicure does not feel thick at all. I was worried it would feel like I had a billion coats on...but not at all!!!!

I also found a new cure all for my yuck cuticles. As my readers, you know I have been fighting with them for about a month or so now. I found my cure!!!

Sally Hansen's Instant Cuticle Remover! This stuff is STRONG, so I only use it MAYBE once a week. I don't like to be harsh on my skin...so I try for once every other week. I love it! I follow the directions on the bottle, and this stuff just takes away all the cuticle grossness. I love it! I wash my hands after use, and then apply Solar Oil and lotion. I am so so so happy I found this stuff!!!


Since it is like 10am here in Oklahoma, I thought I would share my morning routine with you all.

I literally sit in front of this computer reading the 70 blogs I am subscribed to. I drink my coffee, and read everything on my reading list. I make breakfast for my munchkins, and then get to work on planning my next manicure, looking at nail polishes, searching for the coveted Connect The Dots polish (which can be bought on ebay for a low price of $89.95!!!), and read read read, comment comment comment. I try so hard to cheer on other nail blogs, comment on new discoveries or awesome manicures, and give any advice if it is asked for. I am working very hard to get this blog going. So I hope all the people I follow do the same thing. Because what I have found in searching for nail blogs: The people with the smallest number of followers always have awesome stuff! No lie. I'm not saying people with a billion followers have lame blogs. They have AMAZING blogs, which is why they have a billion followers. I'm just saying that people like me, who have a few followers, usually have very interesting blogs.

To all you small blogs out there in interweb world: Keep on blogging!! I know I am! Keep up with the dedication and great work! If I have found you, I'm reading!!! If I haven't found you....I WILL!!!

Until next time.....

Christina


Disclosure *I was not paid for this review. I was not given the polish for this review. I paid for the polish with my own money. This is purely my own opinion, thoughts, and suggestions about this polish.*

Wednesday, April 11, 2012

Beetle Juice

After the crazy thick Whimsical, I decided to swatch another polish that I have been DYING to share.

I recently discovered the Wal-mart near my house carries Hard Candy beauty products. My heart skipped a beat when I noticed the VERY small polish selection. I have seen SO many beautiful Hard Candy polishes, I was delighted to be able to see them in person!

The one I decided to purchase is called Beetle. It was $4.00 and 100% worth every single penny.

Wanna know why??


BAM!

Here's what I did:
1 coat Sally Henson's Double Duty base coat
1 coat Orly's base coat
2 coats Hard Candy Beetle
1 coat Seche Vite top coat

On my ring fingers, or accent fingers, as they are fancily called, I did add a stamping pattern using my Konad Special black polish, with Bundle Monster plate BM-208.


I am SO in love. Inside my house, the polish looks more purple/vintaj brassy. But outside it looks more reddish/greenish. I love how the colors change with each angle. I've never had a polish like this before, and I am SO happy Beetle was my first!

I use Solar Oil as my cuticle oil. Like I have said in previous posts, I swear by this stuff. I love it! I even love its weird smell. :)

All of my photos were taken inside, by a window, with my Nikon D5000.

This polish did come with a metallic plastic heart ring. As cheesy as it looks, I will TOTALLY wear that ring!!! <3


Look at that green! YUM!!

I hope you all enjoyed this manicure. It was super easy and I can't stop staring at my nails!!! The application was sooo smooth. I seriously could have just done one coat of this stuff, but I wanted to make sure it was pretty opaque. I am happy it goes on so beautifully in two coats...I think I will be a bit selfish with this polish! ;)

Is this something you would try? Don't forget to check out Wal-mart for Hard Candy polishes! <3

Until next time....

Christina


Disclosure *I was not paid for this review. I was not given the polish for this review. I paid for the polish with my own money. This is purely my own opinion, thoughts, and suggestions about this polish.*

Friday, April 6, 2012

I fail.

Ok, so I totally fail at not polishing my nails. :( Boo.

Yesterday, my daughter Seyhan and I went to Walgreens, and she helped me pick out some new polish! We got four polishes, but I'm saving two of the names for future posts. ;)

The two I just COULD not wait to try were: Sinful Colors: Big Daddy and Savage.

Oh my golly goodness. I freaking LOVE these colors!

Doesn't that look like some summer yummy goodness??? MMMM. After purchasing these two, I knew I HAD to try something. I loooove love love looooved my manicure I posted yesterday...but can you blame me? Really? Who could resist these beauties?

This photo is with the flash. The pattern and colors kinda make my eyes go bonkers...but I think that is why I love it so much!

No flash.

Here's what I did:
A coat of Sally Hansen's Strengthening base coat.
A coat of Orly's base coat.
Two coats of Sinful Colors Big Daddy.
I used my Bundle Monster plate BM-201 for the pattern. (Isn't it amazing?)
For the pattern: Sinful Colors Savage.
 Then I did a coat of Seche Vite.

 Again, with the flash. Isn't Savage goooorgeous????

No flash.
I am so happy I did this manicure. And I cannot express how much I love these polishes. The application was amazing. The brush is just perfect. And Big Daddy could have gone on in one coat, I just did two to even out any bald patches. I love how opaque both polishes are. It is hard to find solid colors that aren't too sheer these days.

Would you guys try this manicure? What do you think of the color combo?? I want to hear from ya!

Until next time....

Christina

Disclosure *I was not paid for this review. I was not given the polish for this review. I paid for the polish with my own money. This is purely my own opinion, thoughts, and suggestions about this polish.*

Thursday, April 5, 2012

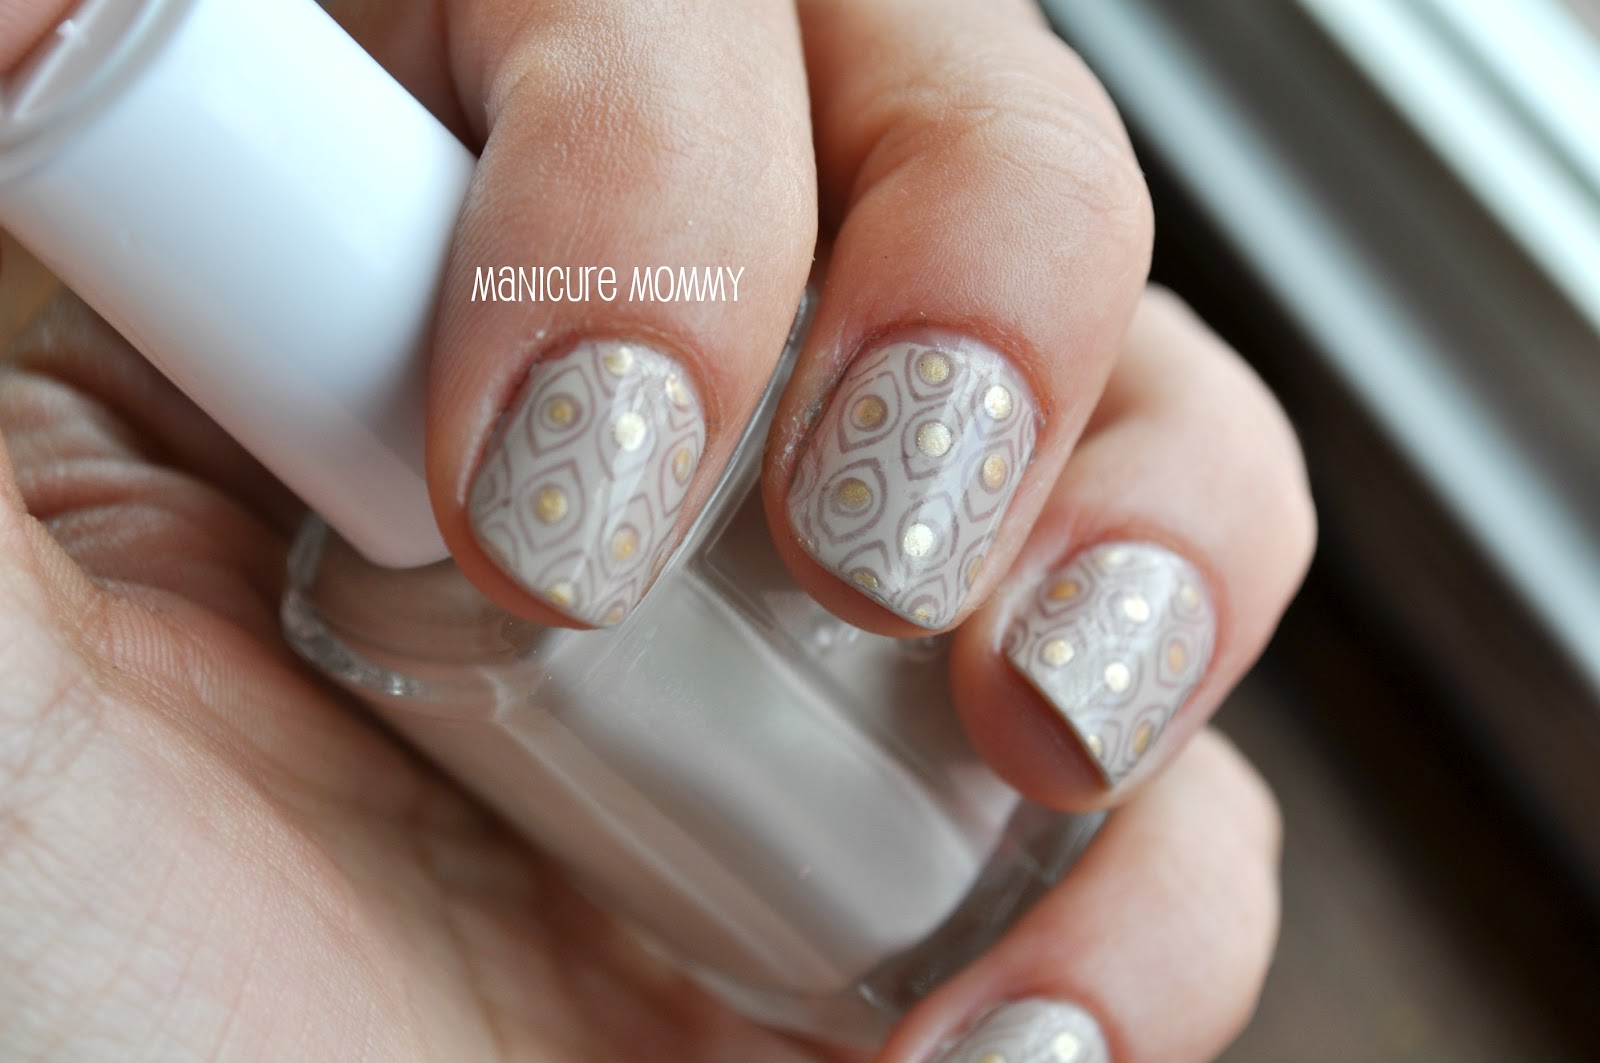
Fancy Dots

Hello readers! I've got a fantastic manicure for you! Seriously, I am SO in love with this one!!

Here's what I did:
I used Sally Hensen's strengthening base coat, Orly's base coat, two coats of Essie's Sand Tropez.
Then with my Bundle Monster plate: BM-212 (You can buy this awesome bundle HERE), I added the print with Essie's Merino Cool. After that was dry, I decided to fancy it up a bit, and used my new dotters (TOTALLY worth the $4.50 I spent on Amazon: you can buy them HERE. And let me tell you how amazing their customer service is! I accidentally ordered two packages of these bad boys, and one dotter was missing! So they're having it sent out to me asap! Which then, I will give to a good friend of mine.) and added some gold dots with my Pure Ice Jaguar. I then topped it all off with a coat of Seche Vite.

I did this manicure yesterday, so sorry for any tip wear. After several doctor appointments today, my hands are screaming at me! "Don't use your nails to open that box of matzah bread!" "I can't believe you are scraping stickers off things without a tool!" "YOUR NAILS ARE NOT TOOLS!" (They actually said these things to me.)


I am just so impressed with how well this came out! I wanted a manicure that wasn't too flashy or bright....we are having family photos taken tomorrow...and I don't want to look back and say "OH MY GOSH Christina! Why did you wear that BRIGHT green polish with that outfit!!!" This way, I am safe!

All in all, a great manicure!! I highly suggest the Bundle Monster plates for your Konad stamper, or other brand of stamper! Some reviews have said that some of the stamps don't work very well...but I have not found a pattern that didn't work well! But I still have a ton of other plates to go through, so who knows. For the price, I can't complain! :D

Being a nail polish addict, I am trying NOT to paint my nails again until after the shoot tomorrow....wish me luck!

Until next time....

Christina

Disclosure *I was not paid for this review. I was not given the polish for this review. I paid for the polish with my own money. This is purely my own opinion, thoughts, and suggestions about this polish.*