Thursday, August 30, 2012

Water Color Nails

Good afternoon! I did an amazing manicure the other day, and I have been dying to share it with you all! It is by far the best manicure I have ever done...in my opinion. :D

So let's get to it! <3

So here's what I did:
1 coat Nail Magic
1 coat Gelous
1 coat NYC French White Tip
1 coat Seche Vite
Then I took Maybelline Fierce & Tangy, Orly It's Not Me, It's You, Wet n Wild On A Trip and I Need A Refresh-Mint and mixed a little bit of each with acetone and dabbed my nail with the polish/acetone dipped brush. I started with the darker colors, then went to the light. I kept adding until I like it.
Then I stamped with Konad Special White and BM-322.
1 coat Seche Vite

I googled water color nails, and found videos...but I watched so many videos on this, I honestly don't remember which ones I watched...sorry. But go to youtube and search for it!

Also, as a side note, I had a dream about doing these nails. I had seen water color nails before, but I REALLY wanted to do a white stamp over it to kind of make the illusion that I painted the lines in between the white spots...if that makes sense.

I hope you all enjoy this manicure! <3

Until next time...

Christina


Disclosure *I was not paid for this review. I was not given the polish for this review. I paid for the polish with my own money. This is purely my own opinion, thoughts, and suggestions about this polish.*

Wednesday, August 29, 2012

Free Form Stripes

Good morning! I have a fun manicure to show you today! (I promise, I am almost caught up to my Instagram..and will be posting blog posts as I go...)

As I told you all before, I bought a ton of new Orly mini bottles, so naturally, I had to keep using them! So here we go!

I must admit, I do not think these are my best work. My lines could be much better, and the dots, which I wanted to look more like lace than regular dots, did not turn out to my liking. But failed or successful manicure will be featured on my blog. I'm human. So I have bad days too.

Here's what I did:
1 coat Nail Magic
1 coat Gelous
2 coats Orly It's Not Me, It's You
I used Pure Ice Black Rage for the black french tip.
Kiss White Striper for the stripes.

I found Orly's It's Not Me, It's You to be wonderful! I absolutely love the shade, the application, and how girly this polish is. This is for sure going on my full bottle wish list!! I love it!

Clearly, I need to do a little more practice on my stripes, but I found the Kiss White Striper polish to be perfect as well. It is my unsteady hands that are the problem. Lol.

Well, until next time....

Christina


Disclosure *I was not paid for this review. I was not given the polish for this review. I paid for the polish with my own money. This is purely my own opinion, thoughts, and suggestions about this polish.*

Tuesday, August 28, 2012

Fiiiiiesta!

Good morning fellow nail polish lovers! I have a few things to tell you all!

So, someone on Instagram had posted a little while back that Haute Look was doing a sale on Orly mini nail polishes. Well, of course, I had to jump on that as quick as I could, and I am so glad that I did so! (You can find Haute Look HERE!) For $35.95, I received the following:

Winter Wonderland
Teeny Bikini
Royal Velvet
Rockin' Rockette
Retro Red
Pure Porcelain
Pixy Stix
Ole
It's Not Me, It's You
Fiesta
Fabulous Flamingo
Cosmic Kiss

These are all in Orly's mini size which is .18 Fl Oz. They are small, but I really enjoy small bottles. Gives me a chance to try out the polish without spending $8+ a polish all at once. (And now I know which bottles I want in full size!) Without shipping (Which was $5.95) these bottles were sold at $2.50 a piece. WHAT A STEAL! They would only let me buy the twelve at a time. I tried to buy more...but no success. Next time I will be prepared with an additional Haute Look account....although I don't know if that goes against their rules....must research!

Any who, the manicure I am showing you today is done using Orly's Fiesta! So here we go!

Here's what I did:
1 coat Nail Magic
1 coat Gelous
2 coats Orly Fiesta
Stamping with Konda Special Black and BM-313.
1 coat Seche Vite

How fun is this manicure?? I love love love Fiesta! It is such a beautiful pink with a little bit of shimmer! Gorgeous!! The application was cake, and so was the clean up! I think I need to buy this polish in the big bottle!!

I really love my new stamping plates from Bundle Monster! (I mentioned these my last post, remember?) This particular stamp is from the 2012 collection. I think the black pattern makes the pink really pop!


Have any of you tried Orly's Fiesta? Do you own Bundle Monster plates? Would you try this manicure?

Until next time...

Christina


Disclosure *I was not paid for this review. I was not given the polish for this review. I paid for the polish with my own money. This is purely my own opinion, thoughts, and suggestions about this polish.*

Monday, August 27, 2012

Snappy Sorbet

Good morning! I have another bright and fun manicure to share! So here we go!

Here's what I did:
1 coat Nail Magic
1 coat Gelous
2 coats Sally Hansen Snappy Sorbet
Then I took Spoiled Club Rat, Wet n Wild Candy-licious, and Orly Prelude To A Kiss and BM-301 and did a subtle gradient.
Using the same plate, I used Konad Special White and added the stamping
1 coat Seche Vite

I really enjoyed this manicure while it was on my fingers. The orange made me look much more tan than I actually am, and that is ALWAYS a win in my book. Snappy Sorbet went on wonderfully. It was a bit patchy with the first coat, but the second coat cleared it up beautifully. I really do love how subtle the gradient is. It is almost like it isn't there, but when you look closely you can see it. Sometimes subtle is the way to go.

I got this stamping plate from the Bundle Monster 2012 collection, which I bought with my birthday money! (Thanks Mom and Dad!!) I have never had any problems with Bundle Monster plates...so you all should go check them out! You can find their plates and other items on Amazon.com. :D

What do you all think? I love me some feedback! <3

Until next time....

Christina


Disclosure *I was not paid for this review. I was not given the polish for this review. I paid for the polish with my own money. This is purely my own opinion, thoughts, and suggestions about this polish.*

Sunday, August 26, 2012

Orbit Review

Good morning! I hope you all are having a wonderful weekend!! Today I have a polish review to share. So let's jump right in!

Here's what I did:
1 coat Nail Magic
1 coat Gelous
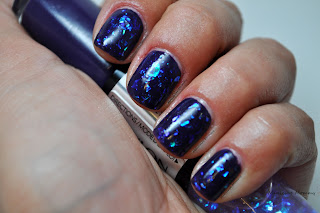
2 pretty thick coats of Revlon purple creme color of this duo stick thing
2 pretty thick coats of the flakies
1 coat Seche Vite

Ok...I found this at CVS, and once I saw the flakies, I was like...omg, I have to have this. But now I'm regretting the purchase.

Here's why:
The creme polish is goopy, patchy, and awful to work with. The flakies ARE gorgeous, but I don't feel like they make up for how TERRIBLE the formula is. I felt like I had a pound of polish on my nails after I was done. I had to put on a ton of polish to make this look decent. And I still don't think it looks that great. I took it off right after taking photos.

Revlon....you really disappointed me. Big time. I even bought another one of these stinkin things. I'm hoping the black/grey one is better than this bottle of crap. Maybe I will try to thin out the polish....but I'm afraid this might be a lost cause. :(

Have you tried these flakie duo sticks by Revlon? What are your thoughts?

Until next time....

Christina

Disclosure *I was not paid for this review. I was not given the polish for this review. I paid for the polish with my own money. This is purely my own opinion, thoughts, and suggestions about this polish.*

Saturday, August 25, 2012

Coastal

Gooooood morning!!! I just want to let you all know that my blog will always be behind from my Instagram. It is tough for me to get onto the computer sometimes. (My eldest daughter is a Minecraft addict. No joke.) I literally write a weeks worth of posts in a night so I don't miss on posts, and don't spend every day on the computer. (Plus with the billions of doctor appointments for my youngest, I really don't have time to blog during the week....but this blog is everything to me, so I MUST keep writing!)

If you have an Instagram, come follow me!! @ManicureMommy   :D

On to the manicure! A while ago I purchased Revlon's Coastal Surf and I have been dying to do something with it!!

Here's what I did:
1 coat Nail Magic
1 coat Gealous
2 coats Revlon Coastal Surf
I stamped with Konad Special White polish and plate BM-322.
Used Julep Alicia for the orangy dots.
1 coat Seche Vite

How crazy fun are these nails? They're so bright. So...summer! :) I absolutely love this blue nail polish. It is bright, and cheery, and a perfect shade. The application was pretty good. Revlon seems to be a bit thin for me, which causes some bald spots...but the second coat covered any flaws.

I really love how this stamp manicure ended up! I am totally in love with Julep's Alicia, so I try to use it as much as I can....and I think it is a perfect contrast color for this blue! I also used more Coastal Surf to dot on top of Alicia.


I really love how summery this manicure is. Right now I have a love/hate relationship with summer ending. I love to wear bright polish (and I will, even in winter!) and shorts and tanks...but my hubs comes back home in the fall...so I am ready for summer to end. Lol. What a dilemma!


What do you all think of this manicure??

Until next time....

Christina

Disclosure *I was not paid for this review. I was not given the polish for this review. I paid for the polish with my own money. This is purely my own opinion, thoughts, and suggestions about this polish.*

Friday, August 24, 2012

Bows and Blue

Good evening! So, I was at Ulta a little while back, and I was rummaging through their clearance shelf. Of course, I had to buy as many as I could, cause I can't turn away from clearance racks....they get me every time!

Any who, I found a WONDERFUL OPI polish that I am DYING to show you all!! Here we go!


Here's what I did:
1 coat Nail Magic
1 coat Gelous
2 coats OPI - I Vant To Be A-Lone Star
I stamped the bows with BM-317 and Konad Special Black polish, and with a Black Kiss Striper polish, I added the "ribbon" of the bow.
Topped it off with 1 coat Seche Vite

First off, I wasn't sure I was going to like this color. It seemed....boring in the bottle. It is pale blue with a hint of shimmer. But boy was I surprised when I slapped it on my nails. I absolutely love this polish. The application was beautiful, clean up = cake, and the color is perfect. It is blue without YELLING blue...if you know what I mean. Such a beautifully pastel blue. If you don't own this polish, run to your nearest Ulta! Hopefully they'll still have a bottle!


I imagine this manicure on a bride, for some reason. Maybe because if I were to get married again, I would wear this polish to knock the blue off the old wives list. But I would make the bows white instead of black.

I'm not a huge bow person...which is why I've never done them before. But I really think they made this manicure even better!

What do you think of this manicure? Do you like bows? What about the color??

Until next time....

Christina

Disclosure *I was not paid for this review. I was not given the polish for this review. I paid for the polish with my own money. This is purely my own opinion, thoughts, and suggestions about this polish.*

Monday, August 20, 2012

red Red RED

Good afternoon!! I wanted something sexy/fancy to wear, so I opted for a red and black french manicure. You honestly can not go wrong with any color of french manicure. I think I succeeded in creating a very versatile manicure.

What I did:
1 coat Nail Magic (Still working its magic!)
1 coat Gelous
2 coats Wet n Wild I Red a Good Book

I free handed the black tips using a Kiss Striping Polish, obviously, in black.
Then I placed Holo nail tape below the black lines.

Because I free handed the tips, they aren't perfect...but hey, I think they look pretty awesome. I love the tape I added! I think it really makes this manicure uber fancy!


As always, the Wet n Wild polish was a bit of a pain in my behind. The brush is ridiculous. I've said in other posts how much I really like the POLISH, just not the brush.

I really think this is an easily obtainable look. If you aren't comfortable free handing the tips, use tape! Or use the little stickers they make specifically for creating a french manicure look! I found my nail tape HERE! Amazon is my go to place for nail art supplies. I am addicted to Amazon...it isn't healthy.

What do you all think of this manicure? What colors would you try?? Have you tried nail tape before??

Until next time...

Christina


Disclosure *I was not paid for this review. I was not given the polish for this review. I paid for the polish with my own money. This is purely my own opinion, thoughts, and suggestions about this polish.*

Saturday, August 18, 2012

Rainbow

Hello! Today I have a crazy fun manicure to share with you. A mani that LOOKS hard, but is actually SUPER easy to do! I've been wanting to try it for a while now, and that's just what I did! So here we go:

What I did:
1 coat Nail Magic (Which has been helping my nails out A LOT, btw. I feel like they're stronger, and they're growing in more healthy than just relying on Biotin.)
1 coat Gelous
2 coats NYC French White Tip

Ok, so here I will list the polishes, then explain what I did.
Sally Hansen- Tough Love
Essie- Braziliant
Sally Girl- Banana
Dots- Neon Green
L'Oreal- Jet Set to Paris
Savvy FC- Deep Amethyst
Revlon- Stunning

I took BM-312 plate, and painted each polish onto the stamp that I wanted. I just lined them up, side by side, even letting them bleed into each other. Then when I swiped the polish off, I made sure to do it in the direction the lines were facing. (so if they were up and down from your view point, swipe WITH the lines, not ACROSS the lines.) Then I took the little rubber stamper as usual, and in a rocking motion, placed the pattern onto my nail. Easy peasy!

Then I topped all of it off with Revlon's Stunning and Seche Vite.


I do wish the yellow would have shown up a little better, but this tiny bottle of Sally Girl Banana was the only non-jelly yellow I have. *Note to self: Buy more yellow polishes!*

I love how bright and colorful this manicure ended up. I love everything about it, honestly. And I was so shocked to see how easy it was! I will be doing more rainbow stamping again!!!

What do you all think? Would you try this manicure? Do you have a good solid yellow polish to recommend??

Until next time....

Christina

Disclosure *I was not paid for this review. I was not given the polish for this review. I paid for the polish with my own money. This is purely my own opinion, thoughts, and suggestions about this polish.*

Thursday, August 16, 2012

Painting the roses REEEED

Good evening! I have a pretty cool manicure to share with you. I went onto Youtube and found a rose tutorial. You can find the video I used as a reference HERE! This gal on Youtube has some AWESOME tutorials, go check her out!

So here's my version:

Here's what I did:
1 coat Nail Magic
1 coat Gelous
2 coats Orly's Decades of Dysfunction

Then I followed the tutorial by taking a large dotting tool with Wet n Wild's Candy-licious and placing the dots for the roses. Then, using a small detail paint brush, I tool Wet n Wild's I Red A Good Book and painted the "leaves" or detail of the roses. Using the same brush, I used China Glaze's Agro for the leaves.

I topped it all off with a thick coat of Seche Vite.

I am really proud of myself, to be honest. I don't do a lot of hand painted nail art, and I'd like to say with this being my first try, I did a pretty darn good job!


Orly's Decades of Dysfunction will be one of my new favorite polishes of all time. It is AWESOME. Application was a breeze, the soft pinkish/white/off whiteish color is gorgeous. I picked this bottle up at Sally's Beauty Supply on the clearance rack! What an awesome find!!!

What do you all think of this manicure? Have you done this? Have you done any other Youtube tutorial manicures?

I hope you all have a wonderful evening!

Until next time....

Christina


Disclosure *I was not paid for this review. I was not given the polish for this review. I paid for the polish with my own money. This is purely my own opinion, thoughts, and suggestions about this polish.*
Sunday, August 12, 2012

Lava Lamp Nails

Goooood morning!!

There has been a trend on Instagram that I knew I had to try. There isn't a definite name to them, but I like to call them Lava Lamp Nails.

I must admit, these were harder than I thought they'd be. But since I've done them once, I am positive I can improve my skills on them. In concept, they seem very easy.

So here's what I did.

1 coat Nail Magic
1 coat Gelous
2 coats NYC French White Tip
I painted half of my nail with Pure Ice Black Rage
Then I took a medium sized dotting tool, and placed the dots along side the diagonal line I created. Then placed the opposite color  dots on each side of the line.
I topped it all off with Seche Vite.

These nails really look so cool on. I feel like they're melting into each other. It's beautiful. I, being my worst critic, see some flaws, but practice makes perfect, so I will for sure be doing these again. I'm glad I did the mixture of black and white for my first time with these. I think it really shows the dramatic dripping to the work. I love it.

What do you all think of these? Have you seen these be done before? Would you try this? What colors would you use?

Until next time....

Christina


Disclosure *I was not paid for this review. I was not given the polish for this review. I paid for the polish with my own money. This is purely my own opinion, thoughts, and suggestions about this polish.*

Wednesday, August 8, 2012

Essie Braided Manicure

Good evening all. I hope you all are enjoying your Wednesday night. I have a really fun manicure in store for you, and a pretty in depth review of the new Essie Mirror Metallic line.

As I'm sure all of you know, Essie came out with the Fall 2012 Mirror Metallic line. I was so excited about this line, I literally went out and bought each and every single one of them. I couldn't wait to try them!

The line is made up of five different colored polishes. There is:
  • Nothing Else Metals - A light pink metallic color
  • No Place Like Chrome - A very metallic silver
  • Blue Rhapsody - A stunning blue metallic
  • Penny Talk - Copper colored metallic
  • Good as Gold - A gold metallic 
I paid $8.00 a bottle for each one. (Totaling out at  $40 without tax...sheesh) I found all of them at my local Walgreens. I am happy/upset that I purchased these. But first, I will show off the manicure I created using Nothing Else Metals, No Place Like Chrome and Blue Rhapsody.


First off, these were nearly impossible to photograph...so I'm sorry if you can not see the detail very well.
Here's what I did:
1 coat Nail Magic
1 coat Gelous
1 coat Nothing Else Metals
Then I used the combination of Nothing Else Metals, Blue Rhapsody, and No Place Like Chrome to create the braided effect.
I topped this all off with Seche Vite.


Ok, these polishes are a PAIN to apply. The application is horrendous. You have to be pretty quick, or else you see beginning to dry brush strokes. If you want to add more on top of the starting to dry polish, forget about it. It creates bald spots. 
These polishes are also NOT forgiving at all. They will show every single flaw about your nails and your painting skills. 
I had to wait for my coat of Nothing Else Metals to COMPLETELY dry before starting on the braided look. I found out waiting for it to dry to add on top is the way to go the hard way. 
After it was dry, I started on the braiding effect. I started on my ring finger, not sure if I wanted just an accent nail, or to do all of them. As you can see from my photos, I had to LEARN how to apply this polish in the braiding manner before getting it right. It is a PRO that this polish dries quickly, but it can also cause your designs to look like poo. I started getting bald spots, the polish started creating poc marks on the areas where the polish overlapped. So my ring finger looks pretty bad.
After learning what to do, it was smoother sailing after that. The trick is to blow on the polish while you are applying your strokes. Then I waited a few seconds before adding another color. 
Now, on to the chore that is the clean up. THESE POLISHES ARE A POLISH ADDICT'S NIGHTMARE! As I was trying to clean up my horrible painting job (Due to having to RUSH RUSH RUSH to get smooth lines), it left this awful silver dust residue. It was SOOO hard to remove. Not that the polish is ACTUALLY hard to remove...it's just that I had to practically scrub my cuticles and skin with acetone to remove the SUPER shiny silver residue. If you look closely at my photos...my skin has a silvery "glow" to it...that isn't good genes or good skin...it's the polish that wouldn't come off. After sleeping/washing my hands/showering, the residue did disappear, but it will take you forever if you rely just on a brush and acetone.


As for the braiding technique...I loved doing it. It was easy peasy, and it turned out sooo stunning. Because this manicure was so subtle, I did opt to do all of my fingers. I got a lot of compliments. And even though the nail polish is a HUGE hassle, the end result was extremely beautiful.

All in all, I DO like this manicure. I DO like the end result of the polish. I DO like the colors of these polishes. I just dislike the application and clean up. I don't know if I will be using these polishes again for a little while...only because I just don't want to do that much work for a simple manicure.

What do you all think about these polishes? Do you have the same problems as I did? Have you ever tried the braided technique? Any tips and tricks I should know about?

I hope you all enjoyed my ranting.

Until next time...

Christina


Disclosure *I was not paid for this review. I was not given the polish for this review. I paid for the polish with my own money. This is purely my own opinion, thoughts, and suggestions about this polish.*

Tuesday, August 7, 2012

Birthday Dots

Hello all!!! Yesterday (Aug 6th) was my 26th birthday! Naturally I had to have some pretty spiffy nails when I went to enroll my eldest into Pre-K. (That is literally all I did for my birthday...getting old stinks.)

Summer is almost over, and I really wanted to take advantage of my bright colors before they look weird in the colder months.


Here's what I did:
1 coat Nail Magic
1 coat Growth Spurt
1 coat Gelous
2 coats Julep Alicia
And I used a small dotter to make my polka dots with Hard Candy Frenzy, Wet N Wild I Need a Refresh-mint, and Konad Special White.
 1 coat Seche Vite

I love love love this manicure. I formed a circular pattern off to the side of my nail, rather than in the middle of my nail. I think it made it look a bit more abstract. I love the color combination, and  Julep Alicia will always be one of my favorite polishes. I adore it.


Application was beautiful, and drying time wasn't that bad. It did take me like an hour to do each and every nail...but let me just say: I was 100% worth it!

As you can see, my nails are crazy short. I had them growing so nicely, then they all broke. It really stinks to have short nails, but I have faith that they will be coming back stronger and hopefully will stay longer. One of my Instagram friends suggested Nail Magic...so we shall see how well it works. This is week one for me. It says it takes up to 8 weeks for stronger nails to come in...so I am testing them!


I have been trying to get good use out of my dotting tools lately. I forget how much I really love polka dots. I must remember this!!

What do you all think of this manicure? Is it too busy? What color scheme would you do?

Also, I would love to hear from you guys about Nail Magic. Have any of you used it before? Did it work for you? I would really like some input on this base coat!!

Until next time....

Christina


Disclosure *I was not paid for this review. I was not given the polish for this review. I paid for the polish with my own money. This is purely my own opinion, thoughts, and suggestions about this polish.*

Thursday, August 2, 2012

And the winner is!!!!

Thank you SO much to all who have entered my giveaway!!! I am proud and excited to announce that Colleen Amos is the winner of the giveaway!!! Colleen, I will be emailing you so you can claim your prize!!! <3

I hope to do another giveaway soon, as well as start posting manicures again! I hope you all had fun with this giveaway!

Until next time....

Christina

a Rafflecopter giveaway